Showing posts with label Recipe. Show all posts

Friday, December 10, 2010

Christmas Hybrid Presents

Hiyo! Sarah here. While I'm still doing the P365 stuff, I don't really have anything big to update on. I can say that this week's layout was definitely self-centric. Not because I'm self-centered, but because this week (well, last, LOL) was my birthday week :)

Birthday Flowers
I got PRETTY flowers from my husband out of the deal! :)

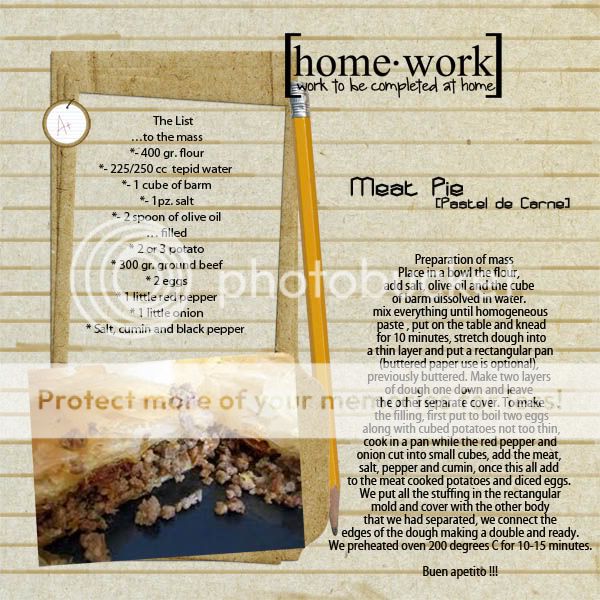
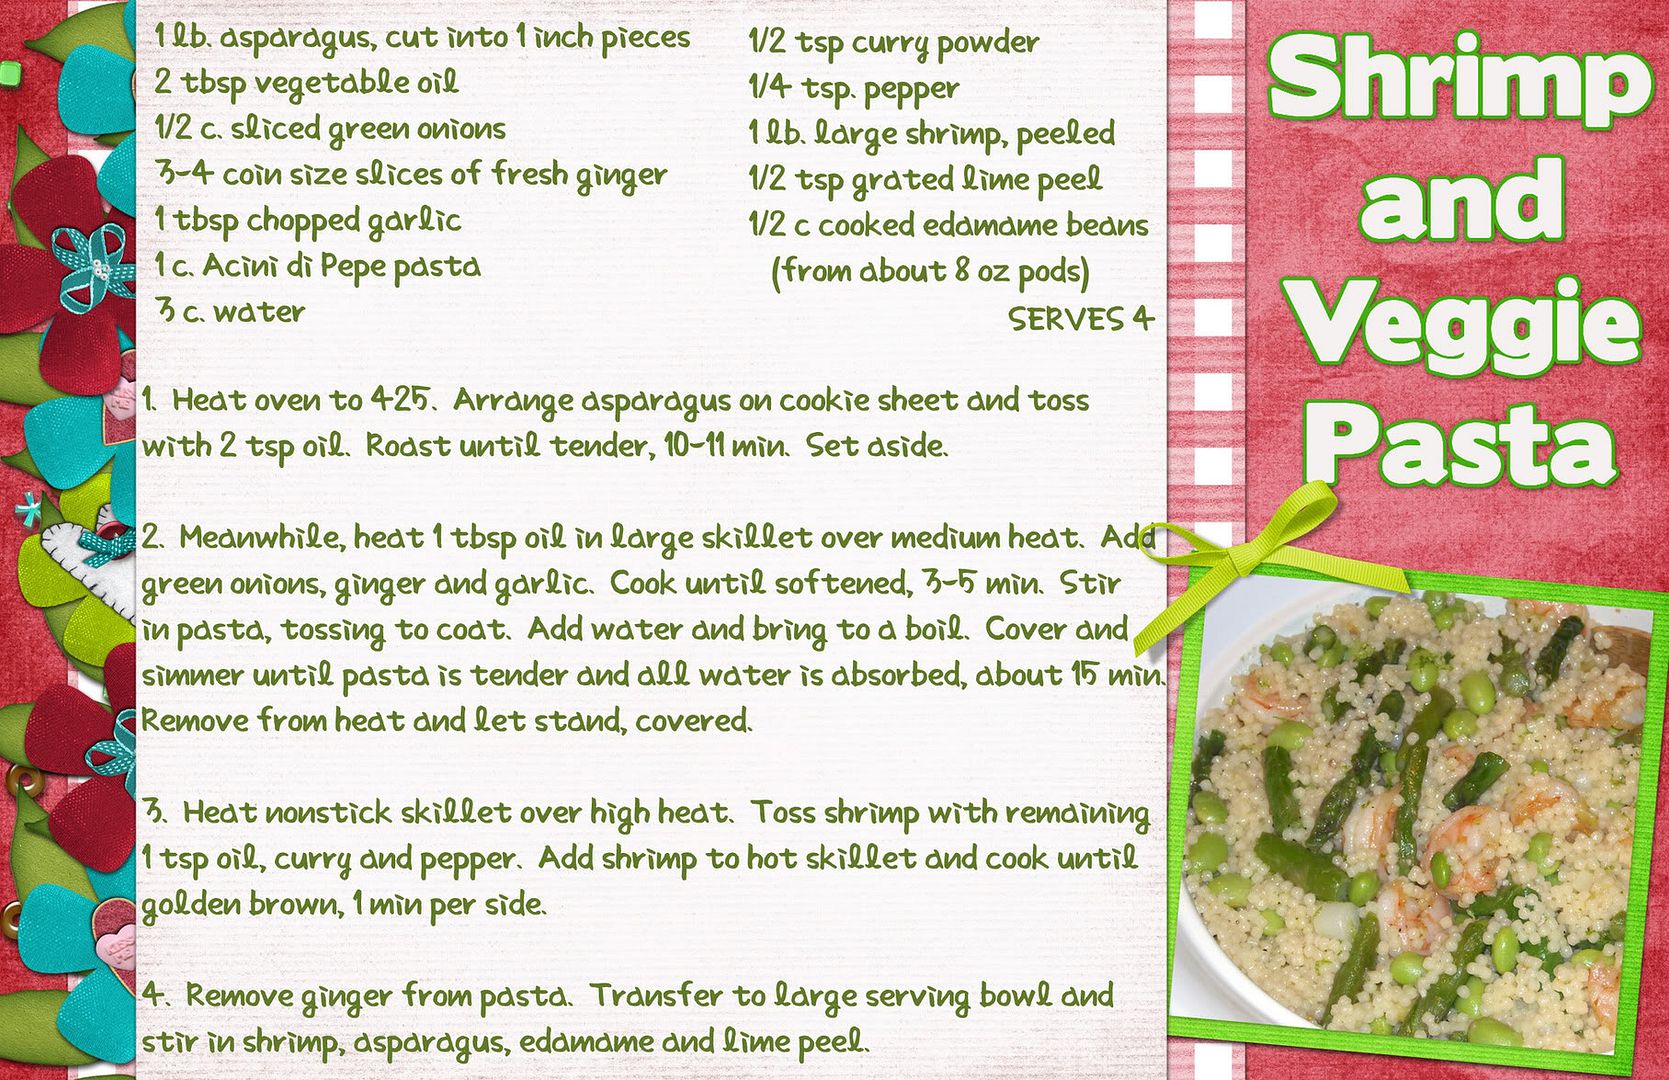
This year, one particular friend who really likes my scrapping is getting a hybrid gift for Christmas. I'm making her a CD calendar full of RECIPES! How cool is that? I think she's REALLY going to like it!! I'm finding this project for my friend is really helping me get my scrap on, and to make her something I know that she'll enjoy. I'm having a ball searching my cookbook, looking for the PERFECT recipe for each month!

Since I'm NICE, I'll share ONE recipe with you that's going to be on the calendar. *shh* Don't tell her!!

Coffee Cooler

1 cup of strong coffee, cooled
1 cup of milk, creamer, or half & half
1 cup of ice
3 tablespoons syrup (the squeeze bottle kind ;))
2 tablespoons of sugar

Combine coffee, half & half, syrup and sugar in a blender.
Add ice cubes, and blend until nearly smooth.

Easy, peasy, right? Enjoy!

Saturday, December 4, 2010

Cheesecake? Yes, please.

Pesty Melanie here with a fabulous recipe for a yummy holiday treat. If you're anything like me, you find yourself making a LOT of treats in December. I'm always looking for new recipes to try and hoping to find some new favorites.  Last month I was in charge of the faculty birthday treats from the PTA at my kids' elementary school, and I decided it was the perfect chance to try out some new ones.  So I pulled out my Bake Sale Cookbook (my favorite cookbook ever) and started searching for mouthwatering treats.  Cheesecake bars sounded like they'd be a hit, and they were.  When I went back to the school later that day to clean up, there wasn't even a crumb left on the platter!


They look scrumptious, right?  I used THIS fabulous hybrid template to make the cards I labeled them with.  I can't show you those yummy treats without sharing the recipe, so if you're looking for some fabulous cheesecake bars for your December treats, I highly recommend this one.  Enjoy!

Cherry Cheese Bars
Base:
1 c walnut pieces, divided
1-1/4 c flour
1/2 c brownie sugar
1/2 butter
1/2 c coconut

Filling:
2 pkg (8 oz each) cream cheese, softened
2/3 c sugar
2 eggs
2 tsp vanilla
1 can (21 oz) cherry pie filling*

Heat oven to 350.  Grease 13x9x2-inch pan.  Chop 1/2 c nuts coarsely.  Reserve for topping.  Chop remaining 1/2 c nuts finely.  For base, combine flour and brown sugar in medium bowl.  Cut in 1/2 c butter until fine crumbs forom.  Add 1/2 c finely chopped nuts and coconut.  Mix well.  Resreve 1/2 c crumbs for topping.  Press remaining crumbs in bottom of pan.  Bake at 50 for 12-15 minutes or until edges are lightly browned.  Do not overbake.  For filling, combine cream cheese, sugar, eggs, and vanilla in small bowl.  Beat at medium speed until well blended.  Spread over hot baked base.  Return to oven.  Bake 15 minutes.  Do not overbake.  Spread cherry* pie filling over cheese layer.  Combine reserved coarsely chopped nuts and reserved crumbs.  Spinkle over pie filling.  Return to oven.  Bake for 15 minutes.  Do not overbake.  Cool in pan on cooling rack.  Refrigerate several hours.  Cut into 2-1/2 inch bars.  Makes 3 dozen.

*You can substitute another flavor pie filling for the cherry pie filling.  I didn't want big chunks of cherries, so I used a hand blender to puree the pie filling first.

Friday, December 3, 2010

Keeping Up With the Holidays

Sarah here!! Just doing my weekly P365 updates.

Okay, I'll admit that I think I'm falling behind on P365. Not the picture taking, though I'm finding myself waiting until the last minute some days. Its more of a "I don't wanna" with the layouts. I know if I don't do it, then I never will. So, I'm slogging along.

The pictures, though, I think, are more fun to look back at and go "Why did I choose that?" In 2011, I plan on using descriptions and thoughts to go with the pictures, when I upload them to Facebook.

Since I don't really have a layout to share, I thought I'd share a recipe. It's a huge fave in my house. It's called Hoosier Pie

2 eggs, slightly beaten
1 c. sugar
1/2 c. flour
1 c. English walnuts
1 stick butter (melted and cooled)
1 tsp. vanilla
3/4 c. chocolate chips
1 lg. unbaked pie shell

Add eggs and butter, mix together well. Add remaining ingredients, pour into pie shell. Bake 40 to 45 minutes at 350 degrees.

Hoosier Pie

Let us

Monday, October 18, 2010

~*~Mini Pancakes with Raspberry Sorbet and Chocolate Sauce~*~

Hey y'all! Pesty Ashley here!

Okay I have this slight addiction to the Food Network, and one of my most favorite shows on there is Giada At Home.  Her recipes always look soooooo good!! Usually I am hesitant to try to make some of that stuff because lets face it.. I live in what we Okies call the BOONIES! It is really hard to find some of the ingredients that they use on that network. But I was watching the other day and saw something I wanted to try, and now I have a new favorite snack!! Here is the recipe for Mini Pancakes with Raspberry Sorbet and Chocolate Sauce. They are super easy and very yummy! even the kiddos can help with this one!

Ingredients

  • 1 cup buttermilk pancake mix
  • 3/4 cup water
  • 1 1/2 tablespoons unsalted butter, at room temperature
  • 1 cup semisweet chocolate chips
  • 1/2 cup heavy cream
  • 1 cup raspberry sorbet  softened
  • 1/2 cup raspberries

Directions


Preheat a griddle or large skillet over medium heat.

In a small bowl, whisk together the pancake mix and water until just blended and slightly lumpy.

Melt the butter on the griddle. For each pancake, add 1 tablespoon of batter to the griddle.

Cook until golden brown, about 1 to 1 1/2 minutes on each side.

Remove to a plate and allow the pancakes to cool completely.

Add the chocolate chips and cream to a small bowl.

Set the bowl over a small saucepan of barely simmering water.

Stir until the chocolate melts and the mixture is smooth.

To serve, put a pancake on a small serving plate.

Top with a 1-ounce scoop of sorbet and put another pancake on top of the sorbet.

Drizzle with the chocolate sauce and garnish with raspberries. Repeat with the remaining ingredients.

Hope you enjoy this awesome snack!

Sunday, October 10, 2010

Ghosts and Witches and Spiders, oh my!

Pesty Melanie here and I love Halloween!  It's not the trick-or-treating that's my favorite part, it's the whole month leading up to it.  The weather chills, pumpkins decorate, costumes emerge, and ghoulish goodies delight!  I love gathering the kids to make some fun Halloween treats, and even though I don't have any photos of my own, I want to share some of these ideas with you. 

Nutter Butter Ghosts
Simple, cute and yummy - perfect combination.  All you need is a package of Nutter Butters, some white candy coating, mini chocolate chips, and (optional) a bit of chocolate to melt or chocolate frosting.  Melt the white candy coating; dip in a nutter butter.  Add two mini chocolate chips for the eyes.  You can pipe on a mouth with melted chocolate or chocolate frosting if you'd like.  Let cool and voila! -- cute little ghost cookies!  I've seen these with and without mouths and I love them either way, so it's totally up to you what you want to do.  The photo has them on sticks - also completely up to you but not necessary.

Witch Hats
Aren't these absolutely darling?!  They're so fun to make!  All you need is a package of Fudge Stripe cookies, a bag of chocolate kisses and some frosting.  Set out your cookies solid chocolate side up, use frosting to attach a kiss to each one, then pipe a bow around the base of the kiss.  That's all there is to it.  Of course, you can make these fancier if you want.  You could dip the cookie in melted chocolate and add spinkles or mini candies.  You could roll the edges in frosting and then in a sprinkles, candies, or edible glitter.  You can choose any color of frosting you like - my favorite for these cookies is green.

Chocolate Spiders
These are so cute, and I'll give you two ways two do them: the pretty easy way and the super simple way. 
The pretty easy way starts with a chocolate cake mix.  Add 1/2 c melted butter and 1 egg; mix to form a stiff dough.  Roll into 1-inch balls.  Bake at 350 for 10-12 minutes.  When cookies are cooled, spread bottom of cookie generously with chocolate frosting.  Attach 4 black string licorice pieces to opposite sides.  Top with another cookie.  With chocolate frosting, attach 2 red hots or mini m&ms.

The super simple way is even easier than that.  Instead of making your own cookies and assembling your spiders with chocolate frosting, you'll need double-stuff Oreos.  Stick your black string licorice pieces into the filling and attach two candies to the top for eyes.

My little goblins and I have so much fun making these tasty treats.  I hope you do, too!  Happy Halloween!!

Saturday, October 2, 2010

Pork Chop Spanish Rice

Pesty Melanie here!  Have you been following Ramona at the DSA design contest?  Her fourth challenge kit, E.T. Highway, reminded me a bit of home.  I don't know any aliens, but I am from the desert where you could find a cactus on every street and mexican food was a regular part of everyone's diet.  I didn't find this recipe until after I had moved away from the Arizona desert, but the yummy spanish rice is like comfort food to me.  This is an absolute favorite meal in my family, and I hope you like it, too.  I usually make more than 4 pork chops since there are 7 in my family, and I've found I like to use crushed or diced tomatoes instead of breaking up whole tomatoes.  Other than that, I just follow the recipe and enjoy! :)


I made this card 4x6 so it's easy to print for just a few cents, but here's the recipe in case you can't see the card.

Pork Chop Spanish Rice
4 pork chops, fat trimmed off
1 Tb oil
1 tsp salt
1 tsp chili powder
1/4 tsp black pepper
3/4 c long grain rice
1/2 c chopped onions
1/4 c chopped green peppers
1 can (1 lb 4 oz) can whole tomatoes
5 green pepper rings
1/2 c grated cheddar cheese

In a large Dutch oven, slowly brown chops in heated oil. Drain off excess oil. Sprinkle chops with salt, chili powder, and black pepper. Add rice, onions, and chopped green pepper. Pour in tomatoes with liquid, breaking tomatoes into pieces with wooden spoon. Cover and bring to a boil over high heat. Reduce heat and simmer 35-40 minutes. Stir occasionally. Add pepper rings and cook 2 minutes longer or until rice and meat are tender. Sprinkle with cheese. Serve.

Saturday, September 25, 2010

Time to cook ….


Hello everyone!!!

It’s pasta time, yeahhh!!!! i love the pasta and my sons too.

here a recipe to easy to make with a childs, and with a good flavor…

I like  to change the way of making pasta, not always the traditionals pasta with ragu sauce.

I change the macarroni & cheese for this new recipe, because here in Italia not is usual eat cheese sauce =)

Well, are you redy for cooking now…?

The list:

*Spaguetti pasta (500gr.)

*cream

*diced bacon

*olive oil

*salt, pepe & nutmeg

*grated cheese

How make it…

Put a pot of wather, when bolling add salt and pasta.

Meanwhile, put in a pan a little olive oil, add the bacon, when they are golden brown add the cream and nutmeg, heat about 2 minutes

whithout letting the cream thickens.Drain the pasta and add our cream.

Sprinkle with grated cheese, and voul la!!!

I hope you like my recipe, see you next time…

Buon Apetito!!!

Hugs Fabiola.

Saturday, September 11, 2010

Soup's On!

Pesty Melanie here, and I grew up in Arizona.  Also, I don't like soup.  Now you may not think those two things are connected, and neither did I.  I just thought I wasn't a soup person, but then I moved to Utah where we have actual seasons and it's freeeezing cold for months and months.  In Arizona we have two seasons: scorching and pleasant - sometimes during "pleasant" it even gets a bit chilly.  Scorching lasts for most of the year, and when others are shoveling snow, we're basking in our pleasant season. 

Somehow that Arizona girl who hated soup became this nutty Utah mom who actually knows what "soup weather" is and looks forward to it.  I have a whole cookbook full of soup recipes that I'm dying to try, so I'm excited that it's finally September, which means it's almost fall, which means the weather will start getting colder, which means we'll need some tasty soup to warm us up on those chilly nights.  This one will definitely be on the soup menu.  It's a vegetable chicken noodle soup, and oh my is it yummy.  I like to use dark meat for extra flavor. 

Here's a recipe card I made with Ramona's Fall Brilliance freebie at DSA and the add-on you can find at Brownie Scraps.  So cute!! 

You can print this out as a 4x6 card, or read the recipe right here.  Either way, enjoy!! :)

Vegetable Chicken Noodle Soup
1 c chopped onions
1 c chopped carrots
1 c chopped celery
1 garlic clove, minced
2 tsp olive oil
¼ c flour
½ tsp dried oregano
¼ tsp dried thyme
¼ tsp poultry seasoning
6 c reduced sodium chicken broth
4 c cubed peeled potatoes
1 tsp salt
2 c cubed cooked chicken breast
2 c uncooked yolk-free wide noodles
1 c fat-free evaporated milk

In a Dutch oven or soup kettle, sauté onion, carrots, celery and garlic in oil for 5 minutes or until tender. Stir in the flour, oregano, thyme and poultry seasoning until blended; sauté one minute longer. Gradually add broth, potatoes and salt; bring to a boil. Reduce heat; cover and simmer 15-20 minutes or until potatoes are tender. Stir in the chicken and noodles; simmer for 10 minutes or until noodles are tender. Reduce heat. Stir in the milk; heat through (do not boil). Makes about 2 quarts.

Sunday, September 5, 2010

Yumminess!!!

Ramona here, posting for Jessica who is on vacation!  She is our newest pest and she has a fabulous recipe here for all of you!  I can't wait to try this one!  Here is her post, in her own words:

I have a major sweet tooth. There is nothing I love more than a great dessert. The only thing better than a delicious dessert, is one that is easy to make. I found this recipe on line about a year ago, and it is now my go to recipe when I am asked to make a dessert for something. My family loves it as well, and we make it often.

Easy Cherry Cobbler
Ingredients
*one box white cake mix
*one can cherry pie filling
*one stick of butter or margarine
Directions
Take out a large glass baking dish. Pour the can of cherry pie filling into the bottom of the dish. Dump dry cake mix over the top, covering evenly. Melt butter or margarine and pour over the top. This will not cover every part of the cake mix, just try to spread it around evenly.
Bake at 350 degrees until top turns golden brown and fruit starts to bubble. The time varied greatly depending on ovens, but we usually cook for about 30 minutes.
Serve warm by itself or with vanilla ice cream.

Next time you need a quick and easy dessert, I recommend trying this one!

Saturday, August 28, 2010

After School Snacks

Pesty Melanie here with a great recipe to share.  Are my kids the only ones who are STARVING when they come home from school?  Sometimes I'm tempted to serve dinner right when they get home.  They can't even talk to me - or act like human beings - until they get some food in them.  We've tried a few different after-school snack ideas.  One of my girls' favorite "snack systems" is a basket full of crackers and nuts and things in individual bags.  That really did work well, but I feel a lot better about my mothering when I make sure they are offered healthy snacks - and honestly, there were more cookies, chocolate covered pretzels, and processed snack foods than anything healthy in that basket.  So in my effort to be a better mom who at least offers more healthy foods, I try to keep a veggie tray in the fridge always ready for a quick snack.  It's amazing to me how fast it's inhaled when it's the quickest and easiest thing to eat.  My kids will eat just about anything dipped in Ranch dressing, but when we're really treating ourselves, we make this super yummy veggie dip.  I'm not sure my kids would eat any vegetables other than carrots if we didn't have some great dips to serve with them.  Even cauliflower is tolerable when it's used as a spoon for a delicious dip!  My original family recipe makes a HUGE batch, so this is about 1/4 of the family version and it still makes a bunch.  Beau Monde is a seasoning that I only use for this recipe and it's getting harder to find, but it's totally worth it.  It's great to make this a day ahead and let the flavors meld, but if you can't wait that long, don't sweat it.  Make up a batch and be amazed as your little starvin' darlin's happily eat and eat more veggies than you've ever seen them eat before.  Enjoy!


This recipe card is a little sneak peek of Ramona's newest kit coming soon!

Saturday, August 21, 2010

Hello again everyone! Pesty Heather here...aka isaacsmom. I'm here today to share one of my favorite summer recipes with you. This recipe actually came from my husband's grandmother. When we got married - over ten years ago - one of the best wedding presents I received was a bunch of recipes from his family. I have always admired the great cooking that his grandmother does and so I was ecstatic to be let in on some of the family's secrets!


The recipe I am sharing today is for a delicious summer salad called Curly Mac Salad. I love this salad for many reasons. For one, it is easy to prepare and since I am not the worlds best cook, that is essential for me! LOL! I also love it because it uses some great summer veggies and also, it is best when prepared the day before you want to serve it. So, it is great for all those family get togethers. If you are anything like me, being able to prepare something the nigth before is fantastic! I always seem short on time when I am trying to get my two little guys ready to go anywhere! I also thought with the upcoming Labor Day weekend here in the States, this would be a great recipe to share since I know many of us will be visiting family and friends for one last summer barbecue. The best thing about taking this salad to an outdoor get together is that it does not have any ingredients that will spoil in the heat (like mayonaise or sour cream) so you really don't have to worry about keeping it super cold!


I used Ramona's fabulous Giggles and Grins kit to create this fun little recipe card. You can find the kit here in her store. So enough of my rambling...here is the recipe:


I hope you enjoy this recipe and have a wonderful rest of the summer!


Saturday, August 14, 2010

Meat Pie


Wow!!! I’m fabiola and it’s my turn to show you a new recipe “Meat pie”  it’s an Argentina recipe, what do you think?

Ready?…

The List

…to the mass

1- 400 gr. flour

2- 225/250 cc  tepid water

3- 1 cube of barm

4- 1pz. salt

5- 2 spoon of olive oil

… filled

* 2 or 3 potato

* 300 gr. ground beef

* 2 eggs

* 1 little red pepper

* 1 little onion

* Salt, cumin and black pepper

Preparation of mass
Place in a bowl the flour, add salt, olive oil and the cube of barm dissolved in water.
mix everything until homogeneous paste , put on the table and knead for 10 minutes, stretch dough into a thin layer and put a rectangular pan (buttered paper use is optional), previously buttered. Make two layers of dough one down and leave the other separate cover.
To make the filling, first put to boil two eggs along with cubed potatoes not too thin, cook in a pan while the red pepper and onion cut into small cubes, add the meat, salt, pepper and cumin, once this all add to the meat cooked potatoes and diced eggs.
We put all the stuffing in the rectangular mold and cover with the other body that we had separated, we connect the edges of the dough making a double and ready.
We preheated oven 200 degrees C for 10-15 minutes.

Buen apetito !!!

Sunday, August 8, 2010

Saturday Recipe!

Pesty Wendy here, with a late night recipe post!  This is my new favorite summer recipe, it is light and fresh but filling!  I originally found this recipe on bettycrocker.com, but I changed it up just a bit!

shrimp salad recipe full

I hope you enjoy it as much as I do, have a great rest of the weekend!

Saturday, July 31, 2010

It's recipe time!

Pest Angela here with a very easy recipe.

I love baking. Not as much as scrapping, but it is a close second. One of my favorite things to have when I am baking is home made vanilla. Nothing, and I mean nothing, beats home made vanilla. Trust me.

What you will need


6 Vanilla Beans (I use Penzey's Madagascar Vanilla Beans)
2 cups good quality Vodka
Quart Mason jar with lid

1. Cut the vanilla beans in half lengthwise
2. Add the beans to the jar
3. Cover with the vodka
4. Put the lid on and store in a cool, dark place and shake every couples of days for at least a month. The longer you let it stand the more intense the flavor will be. I like mine to go at least six weeks. When you are ready strain it through a coffee filter or cheese cloth into dark bottles and seal tightly.

Isn't that easy. Kind of makes you wonder why you pay so much for it in the stores.

When using your new batch of home made vanilla you will use it just like you do the store bought kind. After you use it for the first time you may find that you don't need to use as much.

And that is how you make vanilla.

Saturday, July 17, 2010

Monkey Munch.... Say what?

Hey Y'all! Pestie Ashley here... Today I am going to share one of my most favorite snack recipes with you. This recipe is SUPER easy and very kid friendly. My daughter Kiley loves to help me make it! I do have one little teeny tiny problem though......(*blushes*)

I have got to go to the groceries store before I can give you the recipe!
So check back this evening and you will find an awesome recipe with photos to go along with it=)
Okay so.. Now that I'm back I want to apologize for not getting back here yesterday evening. I have been doing home work all weekend! But I'm finished with my classes now SO on to Monkey Munch. I hope you enjoy my recipe and photos=) ClickHERE for Larger Photo

  Ingedents:
1c.    Chocolate chips (I use the whole bag.. but I like chocolate!)
1/2c. Peanut Butter
1/4c. Butter
1 Tsp. Vanilla
1c. Power Sugar (I also use more of this. I eye ball it)
1 Box Honey Nut Chex cereal

1. Combine chocolate chips, peanut butter, butter, and vanilla in a microwave safe bowl. Microwave for about 2 1/2 minuets. Stir until smooth.
2. Poor over cereal and mix up really well.
3. Poor cereal into a gallon ziplock bag and poor powder sugar over it. Seal bag(Make sure to leave air in the bag) and Shake what your momma gave you!
4. Poor mixture on wax paper to cool.
5. ENJOY your snack!!

Here are a few photos of Kiley and I making Monkey Munch! I hope you all enjoy!!


And this is what happens when you are finished mixing everything!!


Saturday, July 10, 2010

Shrimp and Veggie Pasta

Pesty Wendy here with another recipe for you!  This is one of my favorite meals to make and to eat!  My son was very excited that I was making it again even though we just had it last week.  Having a picture of it was a good enough excuse for both of us!


(click the picture to download the full size)

If you’re not familiar with Acini di Pepe pasta, here’s what it looks like in the package. 

shrimp recipe 002

LOL I should have taken a picture after I opened the package and it ripped all the way down the side.  I had to sweep my kitchen twice and then I still had to vacuum!  And I ended up vacuuming the counter top because I kept spilling it onto the floor trying to wipe it up!  Luckily I was able to save enough to make dinner… :)

You can also use barley in the recipe, but you need to simmer it 30-45 minutes.  Use the same amount of water.

I used Ramona’s new release Love Notes to make the recipe card, don’t you just adore the colors? 

If you signed up for Ramona’s newsletter you got this kit for free!  Did you miss out?  The Bundle is on sale for $6 right now!

Have a great rest of the weekend and check back next Saturday for another recipe!

Saturday, July 3, 2010

Picnic Chicken Pitas

Ramona is back and so are her Pests!!!  Are you as excited as I am???  I'm even more excited that I get to be one of her new CT members.  Just call me Pesty Melanie. ;)  Yay!!!  We get to help Ramona with her blog and we're going to mix things up a little and share a little more than scrapping with you.  We all have more than just scrapping going on in our lives, right?  For instance, we all have to eat, and a lot of us have the added challenge of figuring out what our kids will actually eat.  So let's share some recipes. 

This is one of my family's favorites!  Just like the name says, Picnic Chicken Pitas are perfect for a picnic or a quick summer meal.  I like to grab a rotisserie chicken while I'm at the grocery store to make the prep time even quicker and add some extra flavor.  We're bacon lovers around here, so I always add extra bacon - I mix some in and then sprinkle more on top.  Here's the recipe made with Ramona the Pests's Sail Away kit.  You can click on it for a more readable size.


Picnic Chicken Pitas
About 2 good-size bunches fresh broccoli (or 10 oz pkg broccoli florets)
2 c cooked chicken, shredded
1 c shredded cheddar cheese
1 medium onion or a few green onions, chopped
1/4 c mayonnaise
2 Tb prepared mustard
1/2 tsp salt, optional
1/8 tsp pepper
4 pita pockets (6 inches), halved
4 bacon strips, cooked and crumbled (more if you're a bacon lover)

In a large bowl, combine the broccoli, chicken, cheese and tomato.  In a small bowl, combine the mayonnaise, mustard, salt (if desired) and pepper.  Pour over the broccoli mixture and toss to coat.  Spoon about 3/4 c into each pita half.  Top with bacon.  Note:  I like to add Ranch dressing to the mayo mixture - probably about 1/4 c.  You can adjust amounts to taste and make it your own. 

I hope your family loves it as much as mine does!

Saturday, November 21, 2009

Gluten Free Gravy

Ramona here! I'm so excited to get to post to you all today! First let me start by thanking my AMAZING pests for all their hard work and their awesome posts! They love planning and plotting the next surprise for you all, and I appreciate them so much! I LOVE having them on my team!

Many of you may or may not know that I have Celiac Disease. I was diagnosed in February, but I have 2 children who were diagnosed first. It basically means that our bodies can not process gluten or anything with gluten in it. It's an autoimmune disorder, not an allergy, which comes with all the other fun autoimmune things! For example, before my 10 year old son was diagnosed (at age 9), he began developing an allergy to everything. He was suddenly allergic to every type of nut, to most fruits, several vegetables, etc. It started to get to the point that everytime he ate, he would break out in hives and have to use benedryl. I was so worried about what that would mean for his future. He also had lots of stomach problems and with my 2 year old already diagnosed with celiac, I took Mitchell in to see if he had the same. His test came back borderline, which the doctor said probably meant positive and we should put him on a gluten free diet. We did and within six months, all the allergies went away. He can even eat nuts again, with no problems. But, his body was just in attack mode because of the celiac.

So, this has led us to a life and a diet free of gluten. For those that don't know (because I didn't until I had to) gluten is the thing in wheat that makes it thicken and stick it all together. So, if you've ever made homemade bread and you knead it. It's to activate the gluten that you need to knead it. But, I've also learned that it's in everything, including some baking powders! Seriously, it's amazing! Eating out is a pain, no more Chinese food, because it is in all the sauces, no more Italian food (for obvious reasons) and many other things are affected by cutting out gluten. Before you begin to feel sorry for us, though, I have to say that I don't mind at all! I have found many ways to duplicate things at home and just make them gluten free! I even made pizza a few weeks ago and it was pretty good! More and more companies are taking pity on us Celiac's and releasing more and more gluten free products, so life is good! As we get ready for Thanksgiving next week, there are a few things we'll just skip (like the stuffing) and some thing we will make ourselves, gluten free! This is a simple recipe, but here is how I make gravy, without using wheat!


Download card HERE

I hope you all have a wonderful Thanksgiving! We are leaving town on Tuesday to go visit all of my family in Nevada. I'm very excited to spend the time with them. I won't be on much, because I won't have a computer with me, however, I have prepared a few holiday goodies for all of you and my awesome pests will post them for me, while I'm gone!

Thursday, November 19, 2009

Thanksgiving Recipe

We are on the final countdown to Thanksgiving, only 1 week to go! I actually get 2 Thanksgiving meals this year, we are celebrating tonight with my dad's side of the family. My 2nd cousin and her daughter are in from Australia, so that will be a lot of fun, I haven't seen her in almost 10 years and our kids are close in age - my son is looking forward to meeting his "cousin" from down under!

So, I would like share a recipe that I like to serve for Thanksgiving, but is easy enough to do all year long! I personally am not a huge fan of green bean casserole, so I serve fresh green beans instead. I love the flavor of these Sesame Green Beans: (picture is linked to download)

Don't forget to leave a comment on THIS POST to be entered to win Ramona's newest release Love Walks In!

Thursday, November 12, 2009

Thanksgiving Recipe- Cranberry Sauce

I can't believe Thanksgiving is almost upon us! I am looking forward to Rett's first taste of all the Thanksgiving day fare. To help you prepare for this wonderful time of year, we are going to be distributing Thanksgiving themed recipe cards. I think this is a wonderful idea for your own Thanksgiving meals to write down all the recipes of the dishes, hold punch, tie with ribbon and distribute. Also a wonderful thing to stick inside a wedding gift or house warming. Remember to jot down Grandma's famous turkey recipe. The next generation will thank you. Here is my contribution for today, home made cranberry sauce.


You can download here.

You can download the recipe card template HERE to create your own recipes to distribute for Thanksgiving.

LinkWithin

Related Posts Plugin for WordPress, Blogger...